User Guide
Installation
To install Carbon, select Get it now or Try it free from Carbon’s listing on the Atlassian Marketplace.
If you don’t have the permission to do so, contact the administrator for your Jira instance.
Supported Fields
The table below depicts which system fields will be copied in the cloning or template application process.
| Field name | Automatically populated? |
|---|---|
| Summary | ✓ |
| Description | ✓* |
| Assignee | ✓ |
| Attachment | ✓* |
| Team | ✗ |
| Start date | ✓ |
| Issue color | ✓ |
| Rank | ✗ |
| Flagged | ✓ |
| Development | ✗ |
| Due date | ✓ |
| Linked work items | ✓* Same-space only |
| Work Type | ✓ |
| Labels | ✓ |
| Space | ✓ Uses the user-selected target space |
| Reporter | ✓ Set to Carbon |
| Parent | ✓ Configurable at application time |
| Priority | ✓ |
| Environment | ✓ |
| Original estimate | ✓ |
*Media in descriptions and file attachments are copied by reference. Do not delete the source work item if you need to preserve these elements.
*Linked work items can only be included when the target space matches the source space.
Template Features
Templates serve as the foundation for maintaining consistency across your Jira processes.
Creating a Template
Templates allow you to save a reusable blueprint from a source Jira work item that Carbon persists for future use. When you create a template, Carbon captures a snapshot of the work item at that moment and the template becomes an independent copy. Any subsequent changes to the original work item will not be reflected in the template. Carbon stores field values from the source work item, with the exception of media and attachments, which are retained by reference to preserve storage efficiency.
To create a template from an existing Jira work item:
- Navigate to and open the desired source work item using Jira’s native navigation
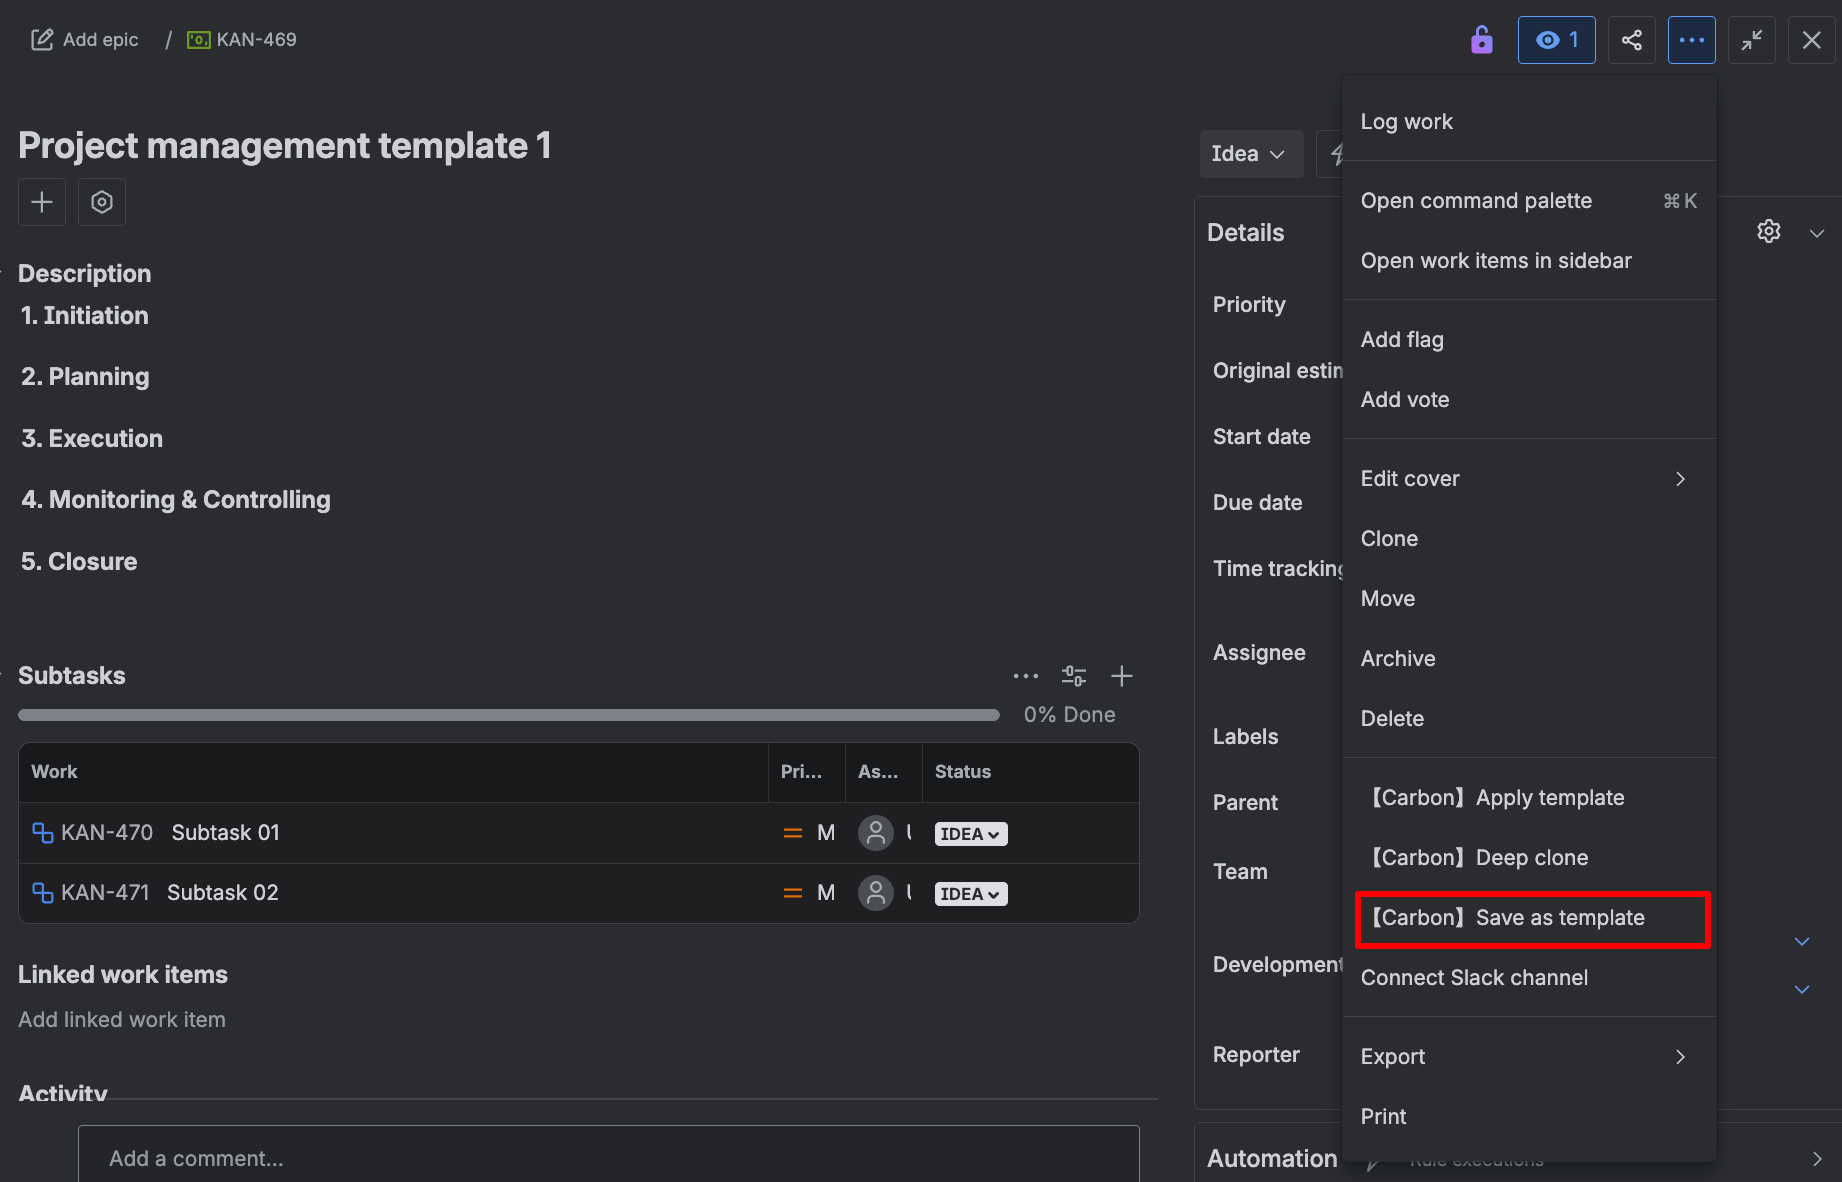
- Click the ellipsis (…) menu in the top right corner
- Select 【Carbon】Save as template from the dropdown menu to launch the template creation modal (this may take a few moments to load)
- Configure the following template parameters:
- Template name: Provide a descriptive identifier for the template
- Template description: Document the template’s purpose and use cases
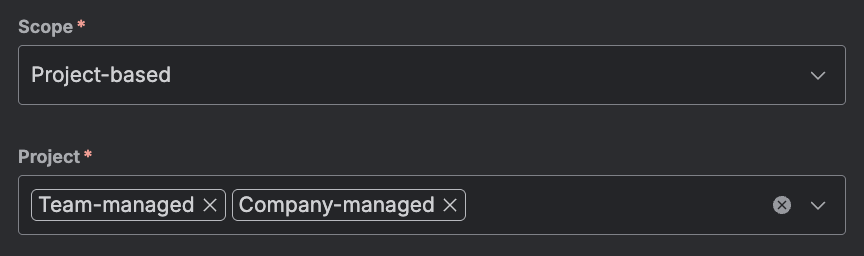
- Scope: Define template accessibility as either global (available across all spaces) or specific space(s), controlling where the template can be applied
Creating a New Work Item from a Template
There are two methods to initiate new work item creation from a template.
From the Sidebar Menu
- Select Apps from Jira’s sidebar menu
- Expand Carbon Templates and Cloning
- Select Apply template to launch the Apply Template modal (this may take a few moments to load)
- Select the desired source template
From Template List
- Select Apps from Jira’s sidebar menu
- Expand Carbon Templates and Cloning
- Select Templates
- On the Template List page, click the Apply this template button for the desired template to launch the Apply Template modal (this may take a few moments to load) with the source template pre-populated
The Apply Template Modal
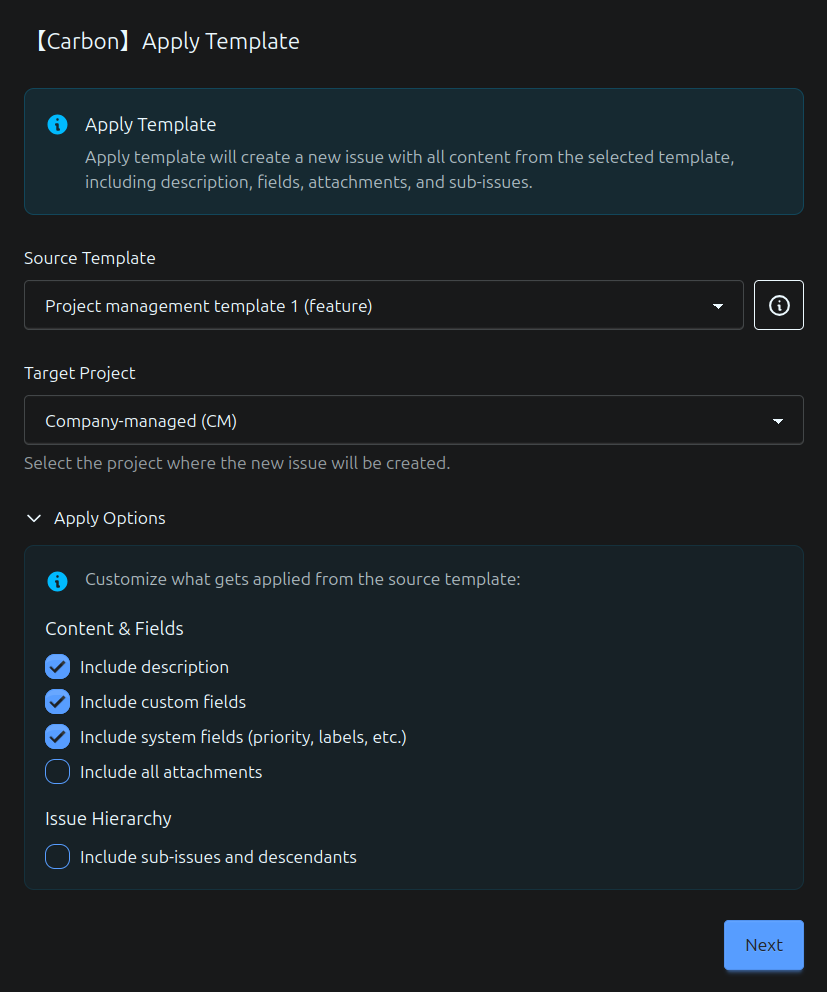
On the modal, configure the following parameters:
- Target Space: Specify the destination space
- Content & Fields: Select which work item fields should be duplicated
- Include sub-work items and descendants: Toggle whether the complete sub-work item hierarchy should be copied
Applying a Template to an Existing Work Item
This capability demonstrates Carbon’s true power: templates can be applied not only to create new work items, but also to modify and enhance existing ones.
To apply a template to an existing work item:
- Navigate to and open the target work item you wish to modify
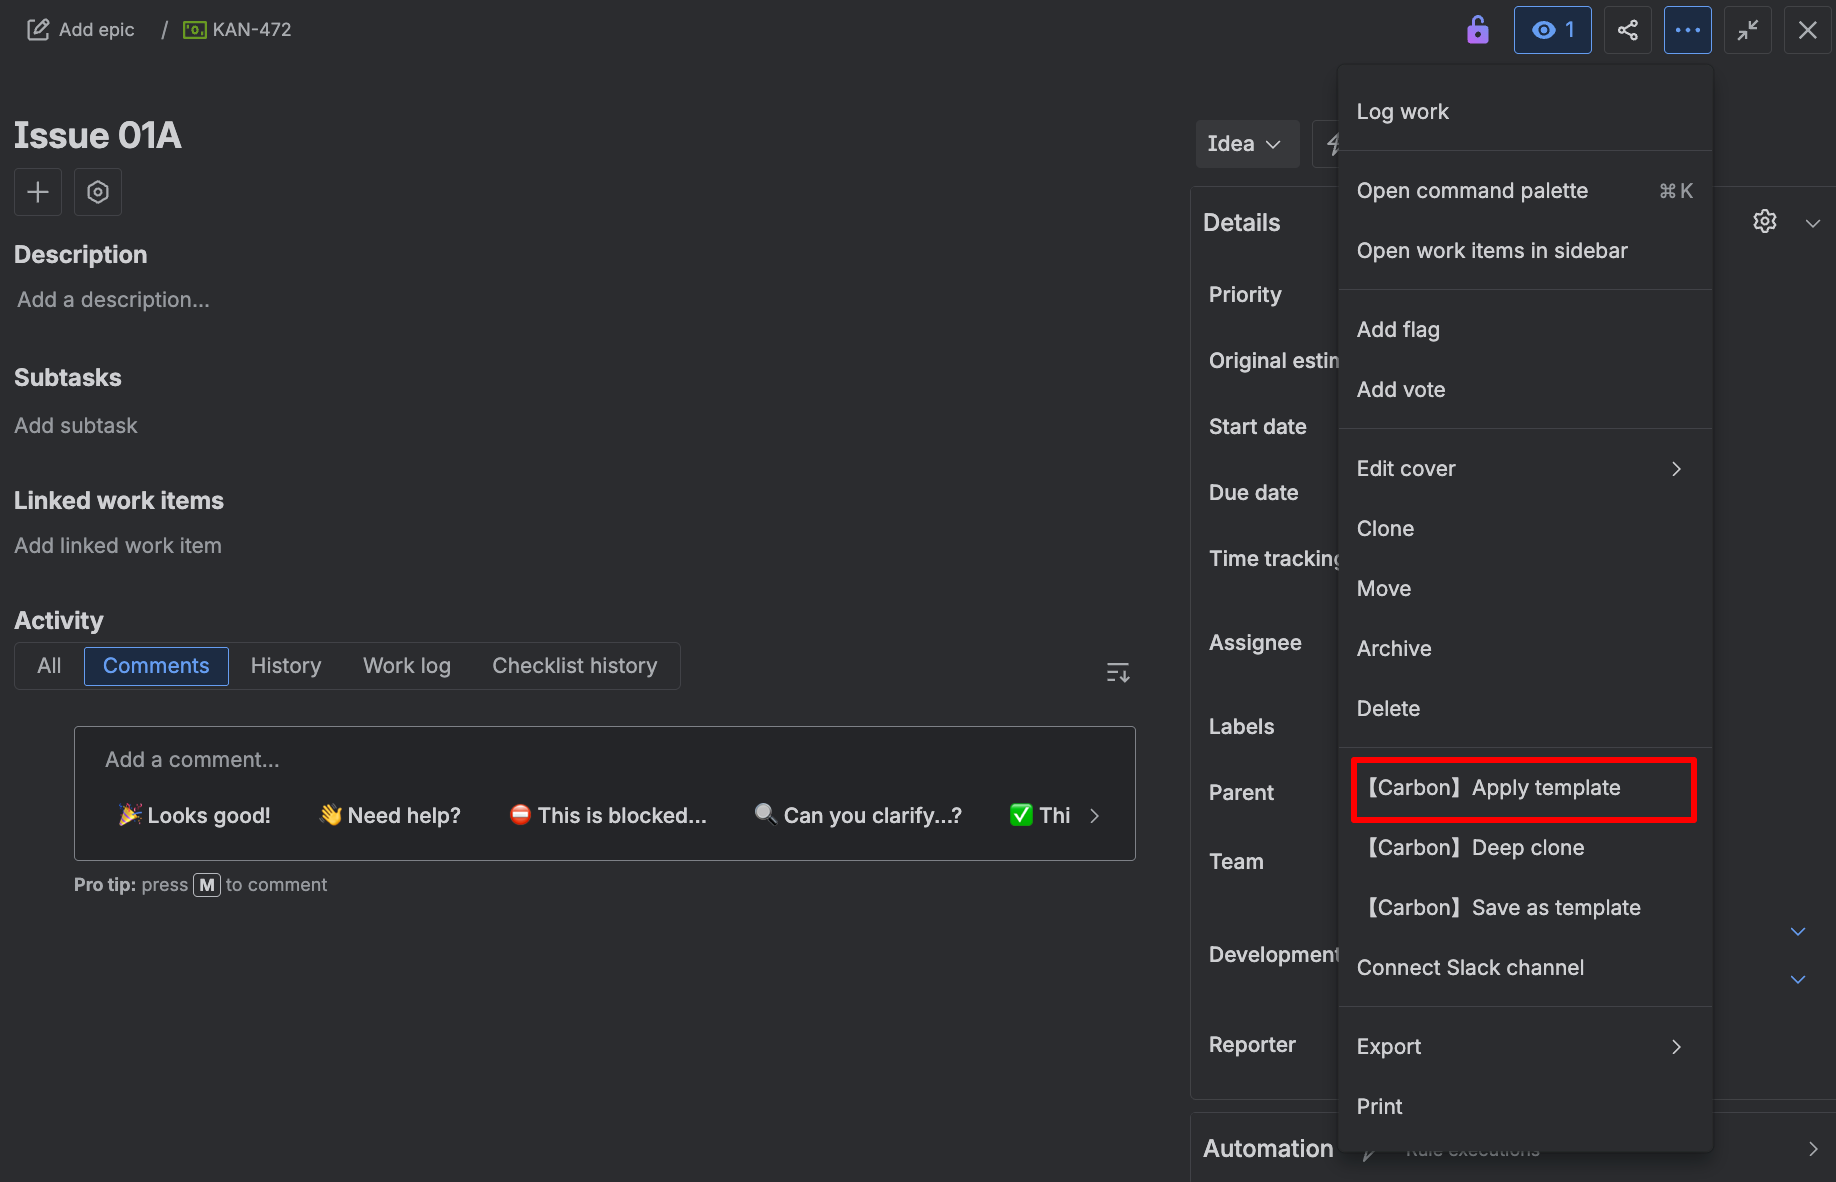
- Click the ellipsis (…) menu in the top right corner
- Select 【Carbon】Apply template from the dropdown menu to launch the Apply Template modal (this may take a few moments to load)
- Browse available templates or search by template name. Note that template visibility is restricted based on the scope defined during template creation, showing only those authorized for the current space.
- Select the desired template to apply
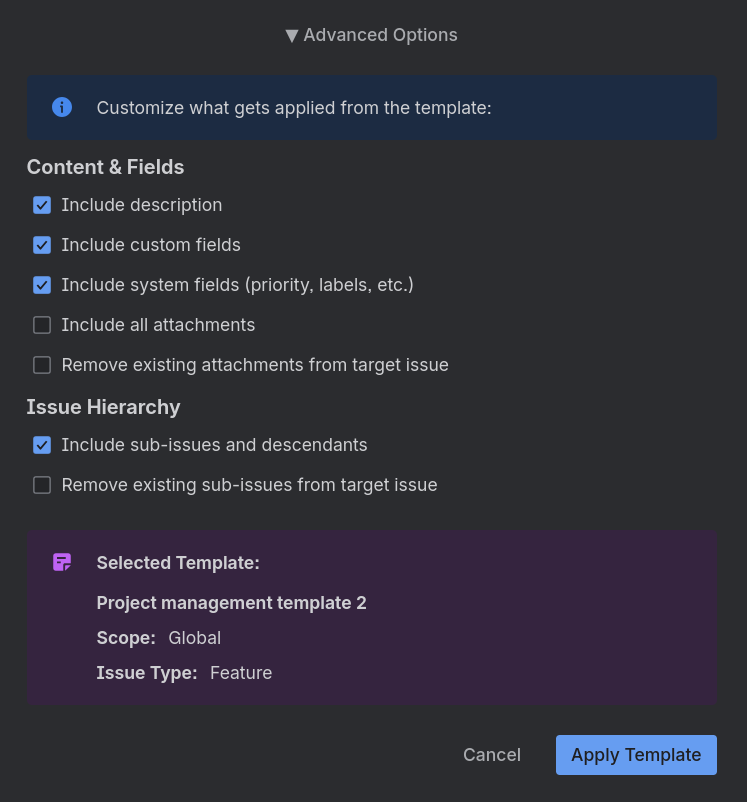
- Configure the following optional parameters:
- Content & Fields: Select which work item fields should be duplicated, with
optional toggles to:
- Remove existing attachments from the target work item
- Include linked issues (same-space only)
- Remove existing linked issues from the target work item
- Include sub-work items: Toggle whether the complete sub-work item hierarchy should be copied
- Remove existing sub-work items from target: Toggle whether to remove the target work item’s existing sub-work items before applying the template
- Parent Issue: Optionally specify a parent for the target work item
- Content & Fields: Select which work item fields should be duplicated, with
optional toggles to:
Managing Templates
Dashboard
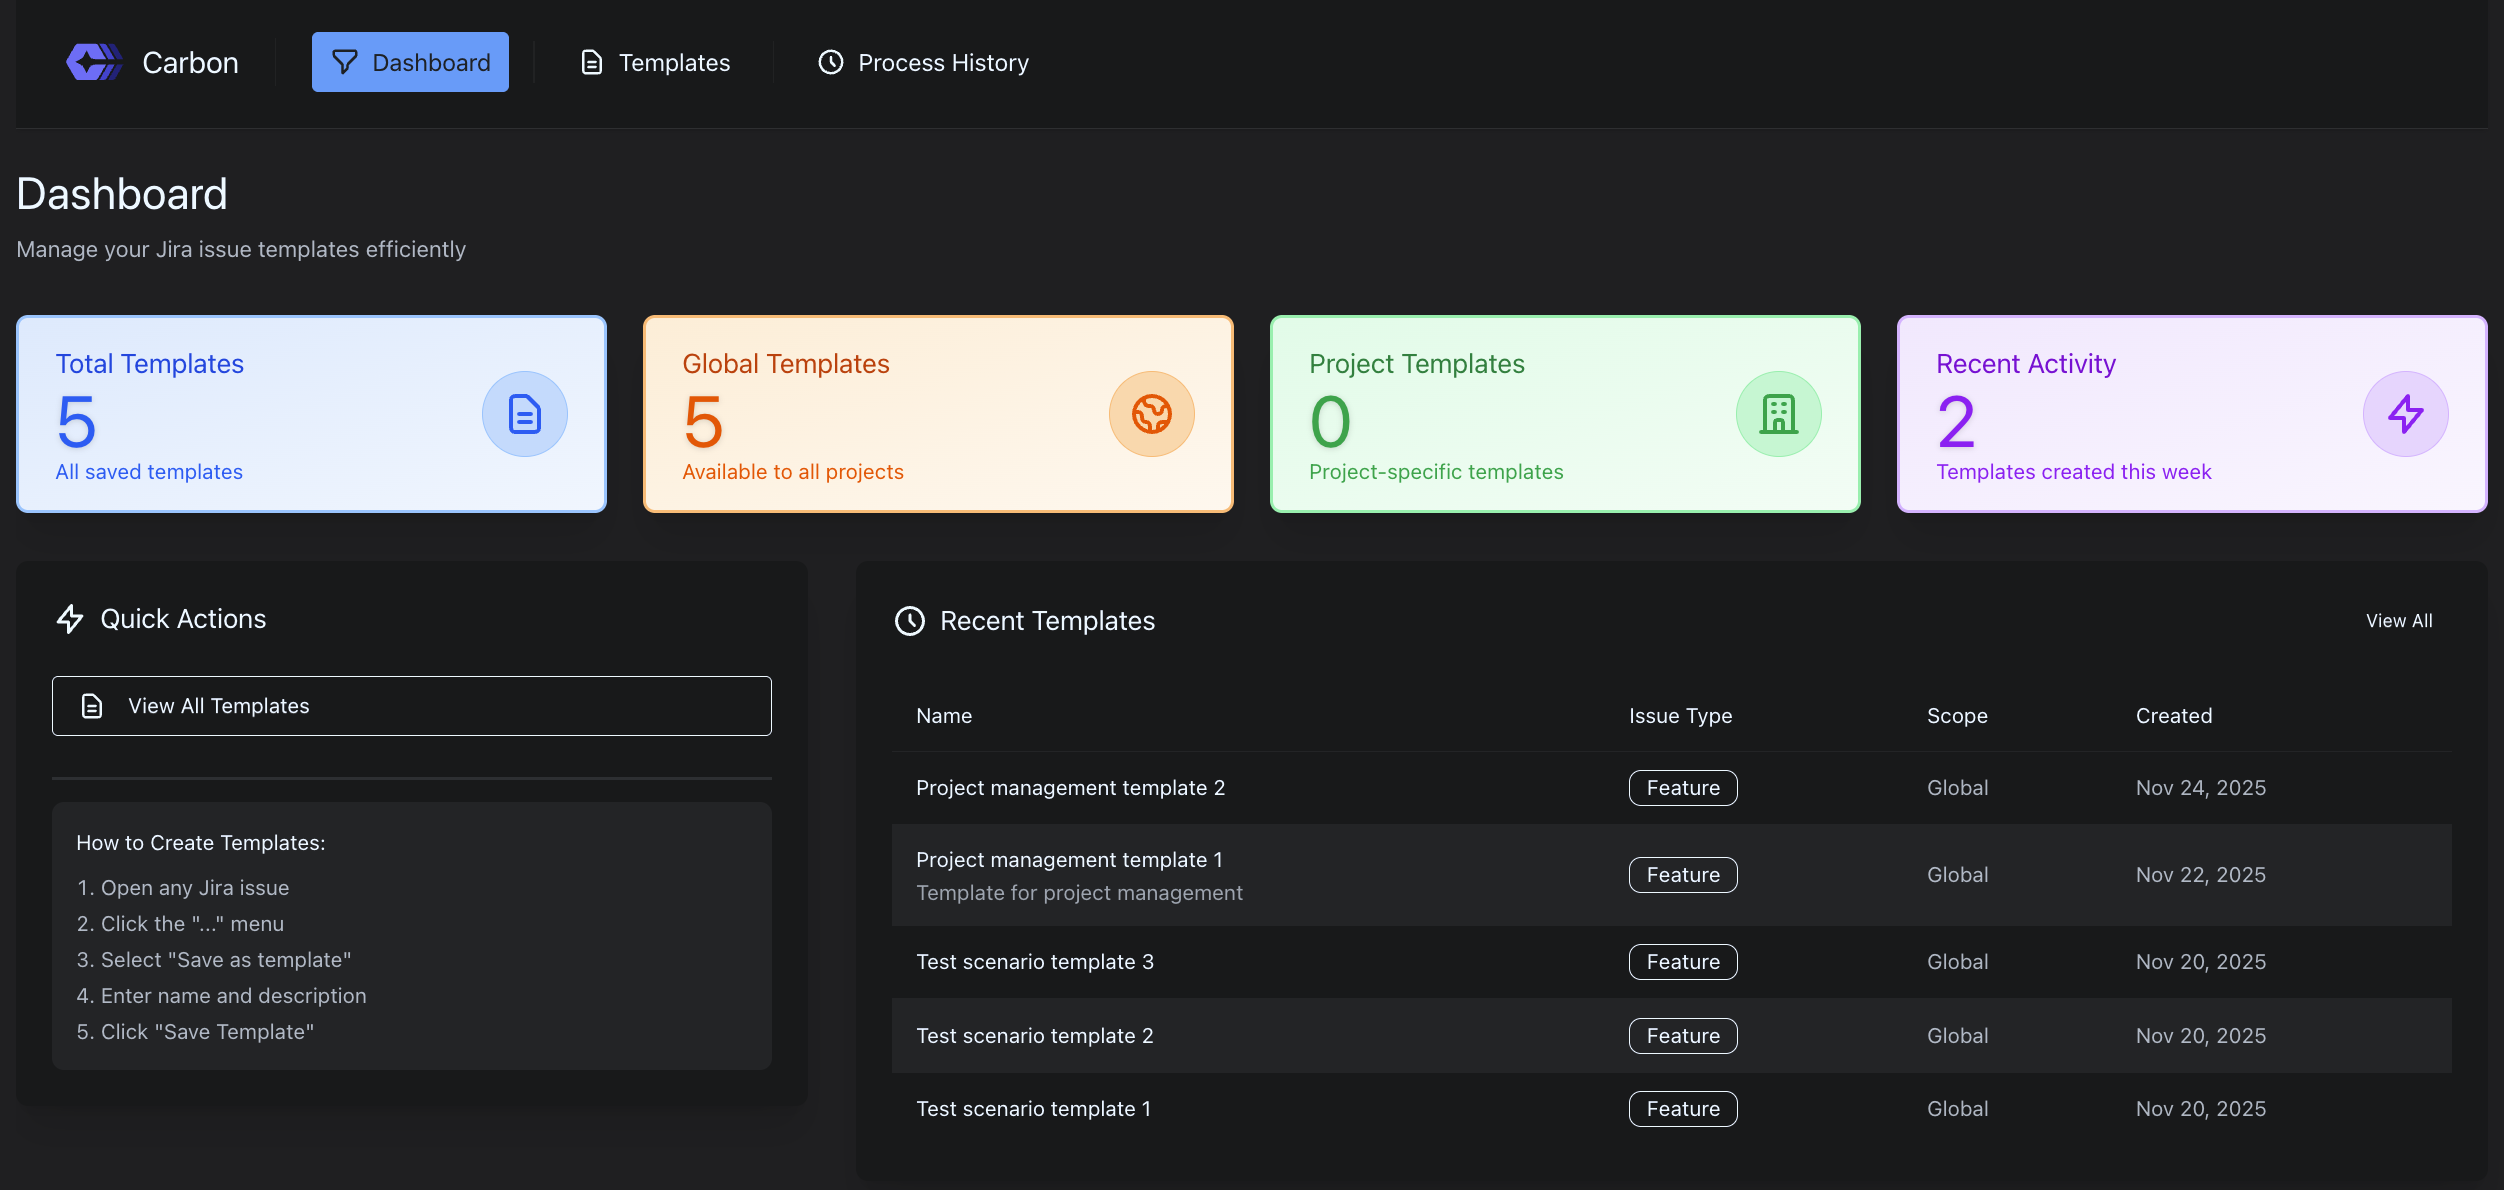
The Dashboard provides a centralized overview of all template activities.
To view the Dashboard:
- Select Apps from Jira’s sidebar menu
- Expand Carbon Templates and Cloning
- Select Dashboard. This lets you:
- Access key metrics at a glance
- Find a quick how-to guide for creating a template
- Track the most recent templates
Template List
This view presents a comprehensive inventory of all available templates. Users can efficiently browse or search by template name, description, or work type.
To view the Template List:
- Select Apps from Jira’s sidebar menu
- Expand Carbon Templates and Cloning
- Select Templates
Template Details
The Template Details page offers an in-depth view of individual templates.
To view a specific template:
- Select Apps from Jira’s sidebar menu
- Expand Carbon Templates and Cloning
- Select Templates
- On the Template List page, select the View template details button for a specific template
- This will launch the Template Details modal:
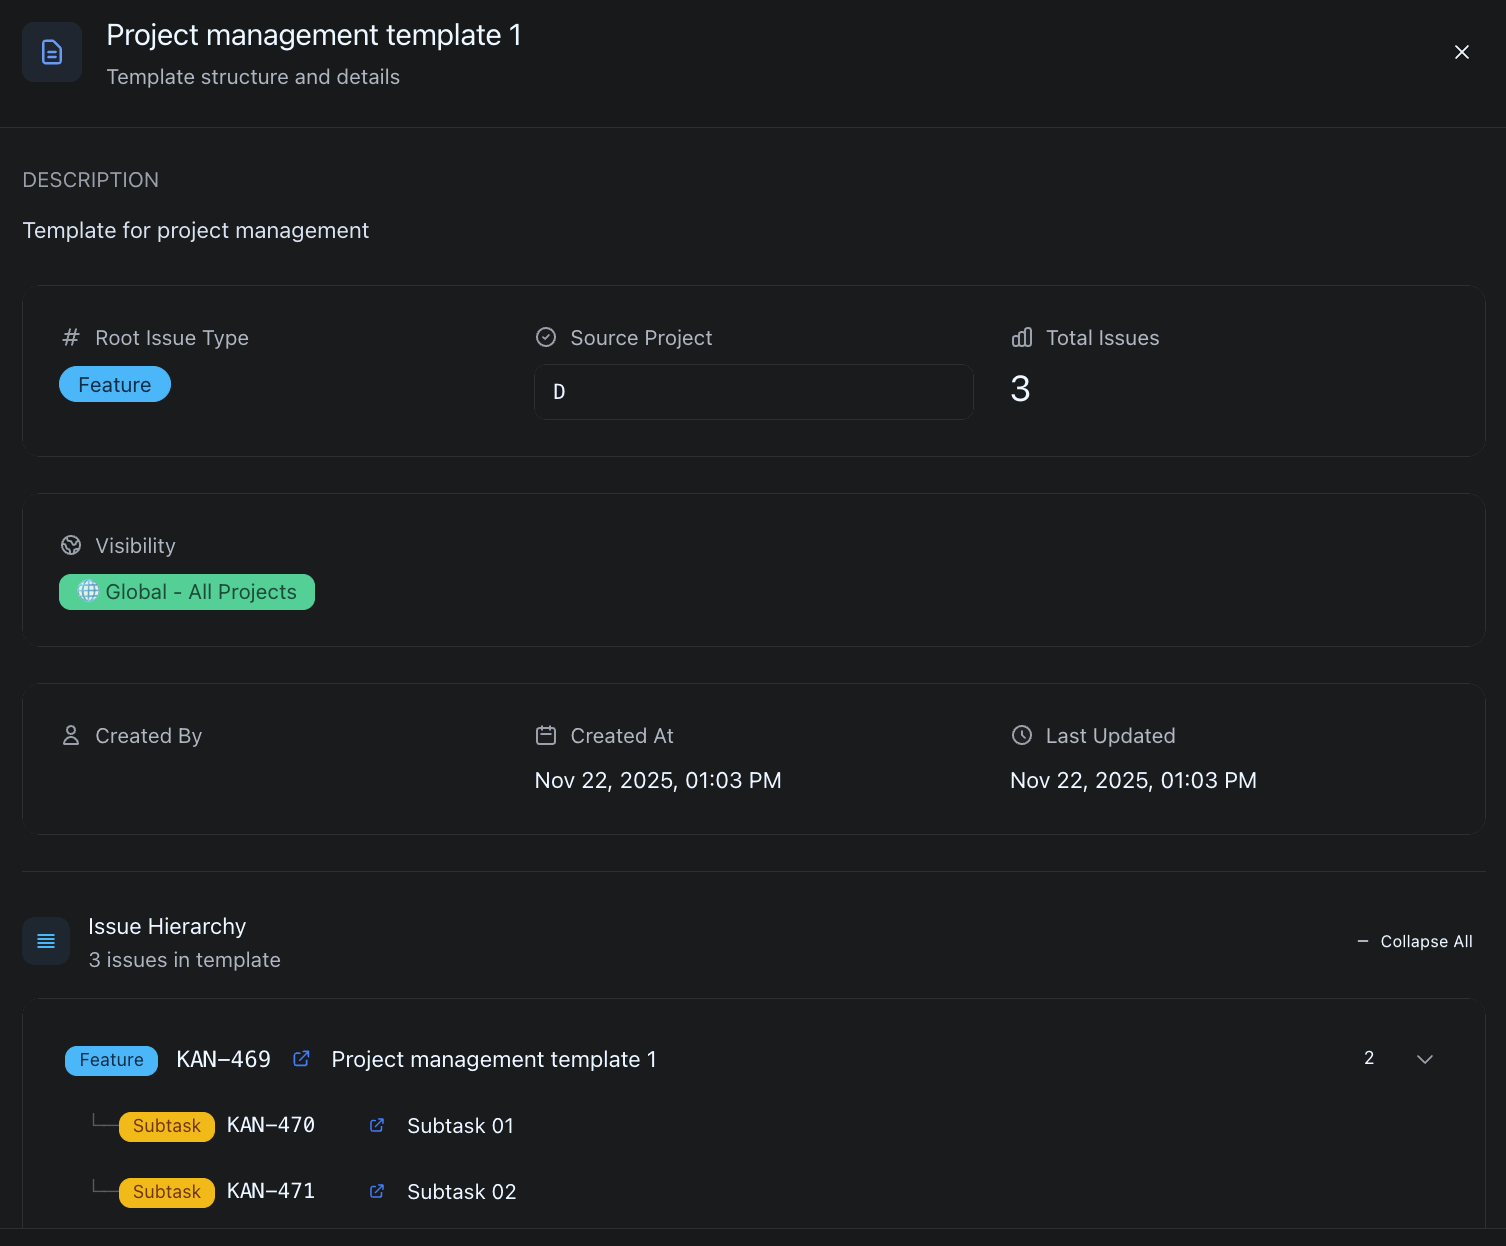
Template Metadata
Template Metadata includes all descriptive information associated with a template, namely its name, description, and scope (global or selected space(s)).
To edit a template’s metadata:
- Select Apps from Jira’s sidebar menu
- Expand Carbon Templates and Cloning
- Select Templates
- On the Template List page, select the Edit template button for a specific template
- This will open the Edit Template page
Template Variables
Template variables allow you to create dynamic, reusable templates with placeholders that can be filled in when the template is applied. This is particularly useful for standardizing work items that require project-specific information like customer names, dates, or other context-dependent values.
Variable Syntax
Variables are defined using double angle brackets: <<variable_key>>.
When the template is applied, Carbon will prompt the user to provide
values for each variable, which will then replace the placeholders in the
created work items.
Example: A template summary might read Onboarding for <<customer_name>>
and when applied with the value “Acme Corp”, the resulting work item
summary will be “Onboarding for Acme Corp”.
Variable Types
Carbon supports the following variable types:
| Type | Description |
|---|---|
| Text | Free-form text input |
| Number | Numeric input |
| Date | Date picker input |
| User | Text field for entering user names |
| Select | Dropdown with predefined options |
Defining Variables
Variables can be defined when editing a template:
- Select Apps from Jira’s sidebar menu
- Expand Carbon Templates and Cloning
- Select Templates
- Select the Edit template button for the desired template
- Navigate to the Variables tab
- Click Add Variable to create a new variable with the following properties:
- Key: Unique identifier used in the template text (e.g.,
customer_name) - Label: Display name shown to users when applying the template
- Type: The input type (Text, Number, Date, User, or Select)
- Required: Whether the variable must be filled in
- Default Value: Pre-filled value (optional)
- Placeholder: Help text shown in the input field (optional)
- Options: For Select type, define the available choices
- Key: Unique identifier used in the template text (e.g.,
- Click Save Configuration to persist your changes
Note: Carbon can automatically detect variables used in your template
content. Any <<key>> patterns found in the summary or description will
be recognized as potential variables.
Applying Templates with Variables
When applying a template that contains variables:
- After selecting the template and configuring options, a Variables step will appear
- Fill in the required values for each variable
- Default values will be pre-populated if defined
- Required fields are marked with an asterisk (*)
- Proceed to complete the template application
Any variable placeholders that are not filled in will be automatically removed from the final work item content.
Linked Issues
Carbon supports copying linked issues when applying templates or cloning work items. This feature is only available when the source and target spaces are the same.
Including Linked Issues
When applying a template or cloning within the same space:
- In the Content & Fields section of the options, check Include linked issues
- All issue links from the source/template will be replicated on the newly created work items
Note: This option is automatically hidden when performing cross-space operations, as issue links cannot span across different spaces.
Removing Existing Linked Issues
When applying a template to an existing work item:
- In the Content & Fields section, you can optionally check Remove existing linked issues from target issue
- This will clear any existing issue links before applying the template’s links
Warning: Removing existing linked issues is permanent and cannot be undone.
Parent Issues
Carbon allows you to specify a parent issue when applying templates or cloning work items, enabling proper hierarchy placement of newly created work items.
Selecting a Parent Issue
When applying a template or cloning:
- In the advanced options, enable Include parent issue
- A parent issue selector will appear
- Search for and select the desired parent issue from the target space
- Alternatively, select Keep current parent to use the parent defined in the template (when applicable)
Note: For subtasks (hierarchy level -1), the parent issue option is automatically enabled and required, as subtasks cannot exist without a parent.
The parent issue selector uses JQL search to find valid parent issues based on the work item hierarchy. Only issues at a higher hierarchy level than the work items being created will be available for selection.
Cloning Features
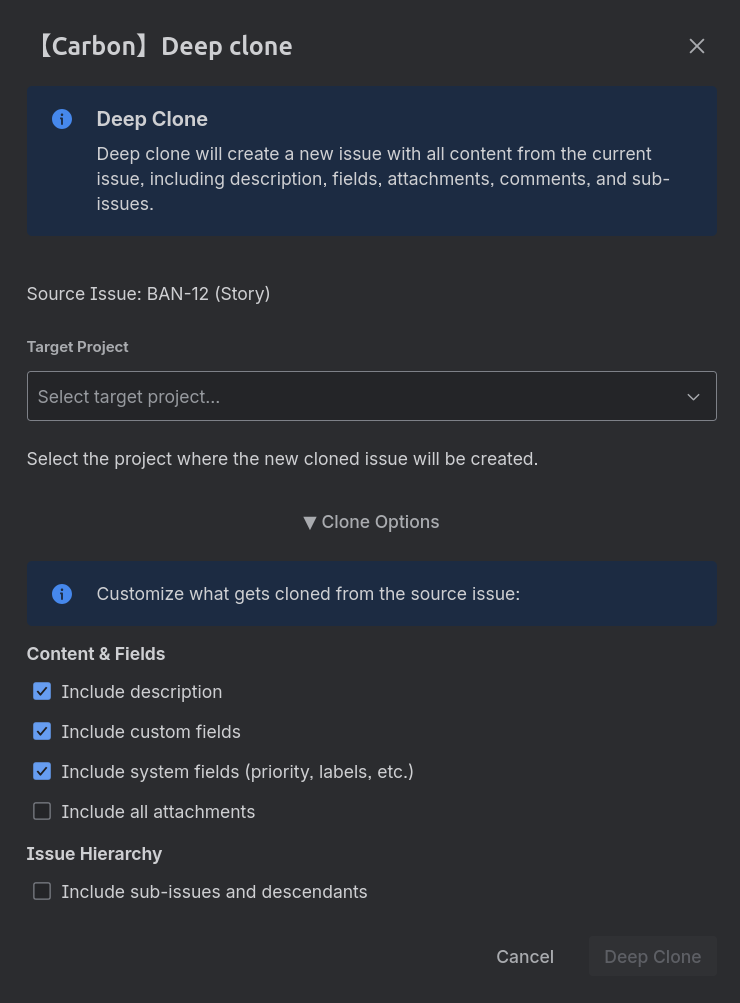
Deep-Cloning a Work Item
Work item cloning enables ad-hoc duplication of individual work items without requiring the creation of a persistent template.
Carbon’s cloning functionality supports cross-space duplication and hierarchical deep-cloning of sub-work items and their descendants.
To clone a work item:
- Navigate to and open the desired source work item using Jira’s native navigation
- Click the ellipsis (…) menu in the top right corner
- Select 【Carbon】Deep clone from the dropdown menu to launch the cloning modal (this may take a few moments to load)
- Configure the following cloning parameters:
- Target Space: Specify the destination space (may be identical to or different from the source space)
- Content & Fields: Select which work item fields should be duplicated
- Include linked issues (same-space only): Replicate issue links on the cloned work items
- Include sub-work items: Toggle whether the complete sub-work item hierarchy should be included in the cloning operation
- Parent Issue: Optionally specify a parent for the cloned work items (enable Include parent issue to access the parent selector)
Monitoring and Settings
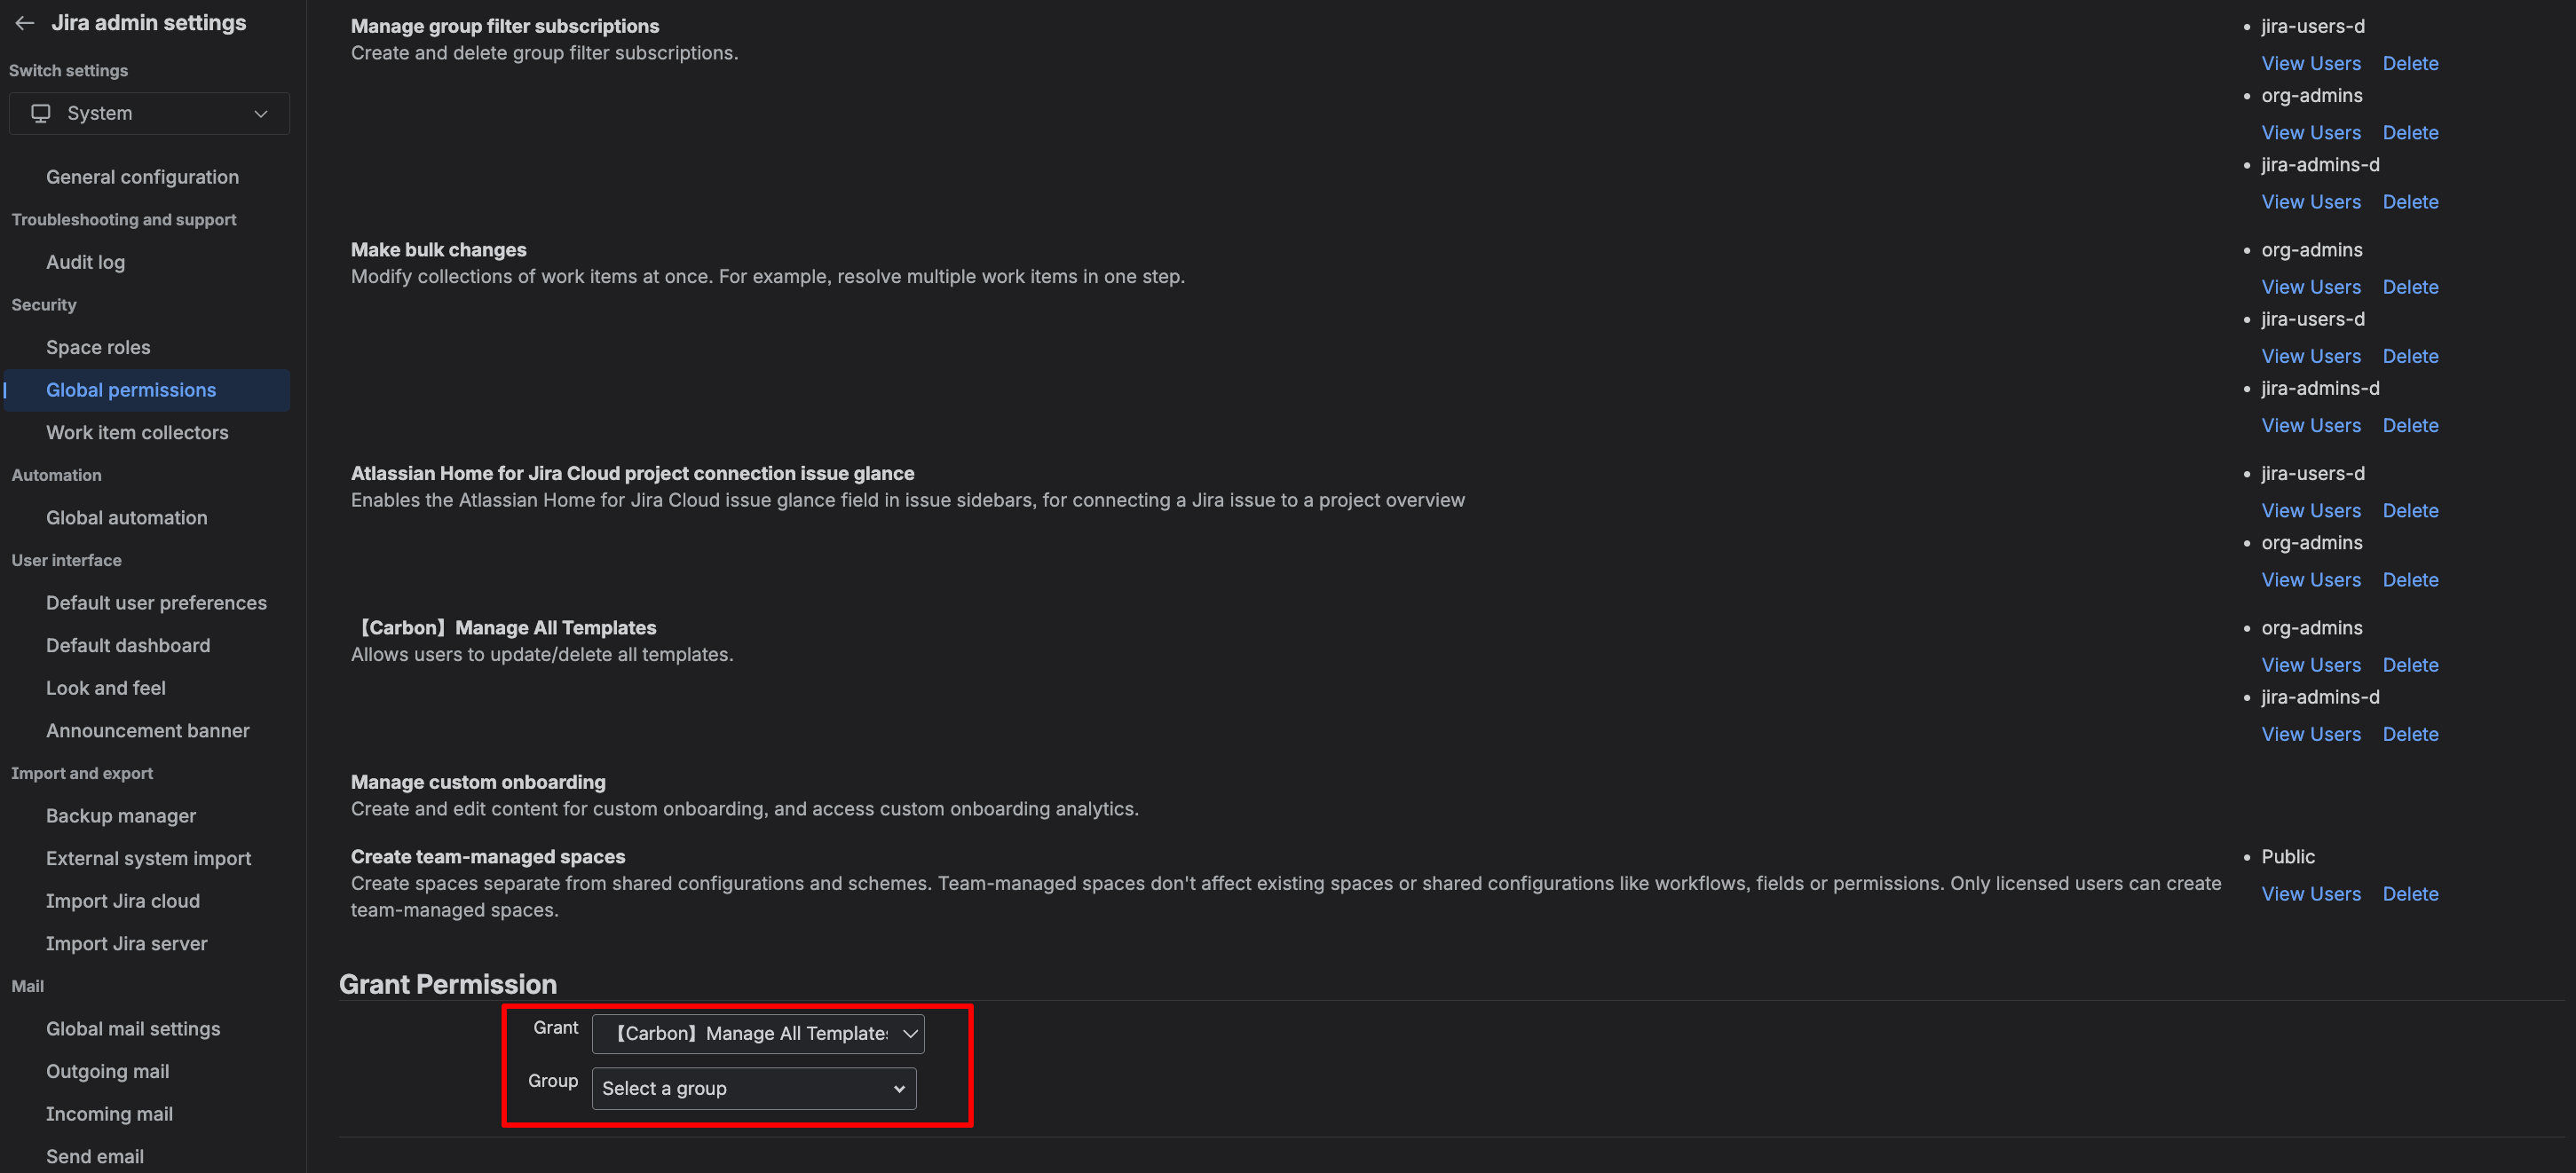
Configuring Template Permission
Site administrators can easily control which user groups are authorized to edit and delete templates.
To configure this:
- Navigate to the cog icon (top right) and select Jira admin settings > System
- In the Security section of the sidebar menu, select Global permissions
- In the Grant Permission section, select Carbon: Manage All Templates
Note: If unconfigured, Carbon defaults to granting this permission to the org-admins group.
Process History
Every time a user clones a work item or applies a template, an entry is automatically recorded in the process history, providing complete visibility and an audit trail of all activities.
Process List
This view displays a chronological list of all user-triggered processes, from most recent to oldest. Users can filter processes by type: cloning or template application.
To view the Process History:
- Select Apps from Jira’s sidebar menu
- Expand Carbon Templates and Cloning
- Select Process history
Process Details
The Process Details page provides detailed information about a specific template application or work item cloning operation.
This page presents the following information:
- Job ID
- Status
- Results, displaying the number of successful and failed work item duplication tasks
- Work item hierarchy, displaying duplicated work items with direct links to their corresponding native Jira work items
To view a specific process:
- Select Apps from Jira’s sidebar menu
- Expand Carbon Templates and Cloning
- Select Process history
- On the Process History page, select the View button for a specific process.
- This will launch the Process Details modal.